So in attempts to pick back up on posting things. I recently (read two weeks ago) made a slip cover for the chair in our bedroom. I found the idea on none other than Pinterest (for those of you that know me feel free to insert eye rolling here). I have been spending way too much of my
free time house cleaning/ studying time surfing Pinterest. For those of you that have Pinterest I know you understand me when I say that it just sucks you in and you do not realize that three hours have past, (but I do feel super creative when I finally pull myself away...even though I have just been clicking re-pin for three hours.)
Anyway, Pinterest is not the point of this post, my slip-covering abilities are. In all my surfing of Pinterest the one thing I kept looking for were easy DIY slipcovers. Not just throwing some fabric over a chair and calling it a day but truly slip-covering a chair. You know like the really nice Sure Fit ones you can buy online. Well call me a cheapskate or impatient but I just could not wait/ afford to get a new slip cover for this chair and I did not want to wait until I could save the money (hence impatient). So in my Pinterest time killing I ran across several tutorials that had made slipcovers from none other than Drop-cloths! You know the ones real painters buy to not mess up floors (unlike me who never fails to lightly step in the paint and unknowingly track it through the house). Well I was skeptical at first but I thought what's to lose, they are cheaper than fabric (since I have yet to find a great cheap fabric store around), and worse case scenario they get to be actual drop-cloths for my next painting project. So I am going to attempt to do a tutorial on how I made my drop-cloth slipcovers.
 |
| the chair before |
Well my project started out with a quick trip to Lowe's for the drop-cloths themselves. This was a slightly confusing trip as I forgot to write down what the other person used on her slipcovers. Anyway I confidently guesstimated the amount of fabric needed. And amazingly I had just enough fabric to cover my chair and the ottoman. Once home with my new fabric selections I immediately washed one of the purchased drop cloths. I was secretly wishing I had too much fabric and would be able to return one (did I mention that I am a cheapskate). So two hours later the drop cloth was clean, dry, and ready for me to begin the slip-covering process.
 |
| This is after the first cut |
 |
| This is the back view |
To begin I just draped the drop cloth, right side in, over my chair being sure it fell into the seat as well as continuing onto the floor in the front of the chair. In order to hold it in place I just used straight pins and directly pinned it to the chair leaving a 1-2 inch seam allowance. This worked for me since I was not worried about messing up the fabric underneath. Once this was securely pinned to the chair I started cutting. I cut off the excess fabric that was draping over the side of the chair. Now this step I will admit had me nervous I did not want to cut and then have too little fabric or too much fabric left on the chair. So once my hands stopped shaking and the cut was made, I then took the fabric from the cut and started pinning it, right side in, to the back of the chair being sure that it left enough on the ground to hem a finished edge later. I just continued in this manner draping and cutting the fabric until I had the whole chair covered in fabric and pins. Then came the fun/pain in the buttocks part...baste stitching the whole thing together. Baste stitching is just a fancy way of saying a loose stitch, just tight enough to lightly hold the fabric together without pins. Once this was complete I held my breath and took the slipcover off my chair. I do not think I have ever been that gentle with something other than babies in my whole life! Now came the fun part, using the sewing machine. I am a very novice sewer so to me the use of my sewing machine leads to tears, screaming, hitting, and the occasional expletive. However the singer and I got through it and I did a simple straight stitch around all my baste stitches still leaving that 1-2 inch seam allowance. Now I know that most seam allowances are 1/4-1/2 inch but as I said NOVICE sewer here and I wanted to be extra sure I would be able to put this baby back on my chair.
Now here came the scary part...putting the slipcover back on my chair! Once I had sewn all the seams, I turned the slipcover back right side out. The with extra care, because I did not have the greatest faith in my stitches I placed the slipcover back on the chair. And would you believe it fit! (and looked half way decent too). I know this has been a super long post but if you managed to hang in here with me you have now seen how easy not horribly stressful it can be to make your own slipcover.
 |
| the basting stitches |
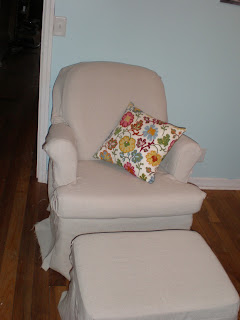 |
| The almost finished slipcover..I still need to hem the bottom. |
And to make it even better when the hubby came home from work/class that evening he said that the drop cloth slipcover turned out wonderfully and he really liked the color and texture it brings to our bedroom. (well those may be my words but I am sure he said something about liking it better than plain white fabric, you know in a really manly way!)
My next attempt is to use the drop-cloths and die them a grayish color to go in our living room over the brown couch and gray/black chair. Have you guys attempted any grand Pinterest projects lately? if so I would love to hear about them. Or are you one of those people I envy and you do not need Pinterest to come up with these ideas. I would love to hear about those too.


